Guitar basics for beginners
If you're just starting on guitar and don't know much about this instrument, the information in this section will help you get familiar with the basics.Guitar anatomy
Learning how your instrument functions is vital towards becoming a successful guitarist. Once you have an understanding of all the parts of your guitar and how they work together to create sound, you'll be better equipped to manipulate your instrument to get the sound you want.
There are two types of guitars: acoustic and electric. Guitar makers build acoustic guitars so they can be played without amplification. Electric guitars require an amplifier to produce a sound loud enough to hear well. Several guitar parts are common to both acoustics and electrics, others are specific.
Watch the video below to learn about the different parts of an acoustic guitar.
Basic guitar terminology
Like any field of study, the science and art of playing guitar is filled with its own terminology. In order to play the guitar and interact with other musicians and guitarists, you'll need to have an understanding of key terms. Below are some key terms defined.
Guitar pick (or plectrum) is a flat, triangular device used to play notes. Note the picture below
Guitar string is the lengthy, metallic wire is pulled across the length of the guitar, running from below the sound hole (or pickups) to over top of the head. The term "note" refers to the striking of a single string to produce a sound. The sound that is generated from the pluck of a single string is referred to as a note. The sound of a note can be manipulated by pressing the strings down on the fretboard, and by playing different strings as well.
Guitar chord is a set of notes played on a guitar played simultaneously or sequentially.
Guitar string names
Each of the six strings on your guitar has a name so that you can easily identify it. These strings are identified below - this information will serve as a stepping stone to getting the sound you want out of your guitar, so it is important to master the material.
-
High E String. The high E string is the thinnest string that produces the highest pitched sound. It is the string that is closest to the ground when you are holding your guitar properly. Many guitarists will also refer to this as the 1st string.
-
B String. The B string is the string directly above the high E string. It is also referred to as the second string.
-
G String. Likewise, this is the string directly above the B string. It is also referred to as the third string.
-
D String. Located directly above the G string, the D string is also known as the fourth string.
-
A String. By now you may be sensing the pattern. The A string is located above the D string, and is also known as the fifth string.
-
Low E String. The final string, the one furthest from the ground when the guitar is held properly, is the low E string. This string produces the same musical note as the high E string, but does so at two octaves lower. Octaves, as well as the distance between notes, will be discussed in greater detail in the music theory section.
The strings have some clear patterns with respect to their naming conventions and their positioning on the guitar: The strings are numbered one through six starting with the bottom string. Starting from the low E string to the high E string, each string gets thicker and produces a deeper sound. In particular, the 4th, 5th, and 6th strings are referred to as the bass strings, as they produce a deeper, fuller sound.
Here's a video that runs through this same topic.
How to hold your guitar
Being sure to hold your guitar properly is something that is extremely important, but is often overlooked by many beginner guitarists. How you hold the guitar is something that easily becomes habitual, so it's important to learn how to hold the guitar properly from the start; otherwise, bad habits will develop. Holding the guitar correctly is simple; there are only a few key matters that you need to be aware of. These are outlined below.
-
Left Hand, Right Hand. The elbow of the hand that you strum with should be at an angle that is slightly less than 90 degrees, so that your hand naturally falls close to the sound hole / pick ups. If you are a right handed guitarist, this will apply to your right hand; your left hand will be the hand that manipulates the fretboard. The opposite is true for left handed guitarists.
-
Back of Body Against Stomach. Ideally, you should hold your guitar so that the strings are properly aligned, and are directly above one another. If you are doing this correctly, the back of the guitar's body should be resting against your stomach. Holding the guitar in such a position will allow you to maximize the mobility of your fingers across the fretboard.
-
Bottom of Body on Lap. When seated, the body of the guitar should rest on your lap. You'll notice that both electric and acoustic guitars have curves in their body; the curve is the perfect place where your guitar can meet your lap.
-
Palm Away From Neck. This third mistake is by far the most common one, and is an easy trap for guitarists to fall into, even after they have become experienced: the palm of the guitar should not touch or rest against the back of the guitar's fretboard. Your thumb can push against the back of the neck - this often makes pushing the strings down easier - but the palm should not "hug" the neck. Hugging the neck can substantially limit the guitarist's mobility up and down the fretboard.
Tuning a guitar
Knowing how to tune a guitar properly is invaluable for your success as a guitarist and something that everyone should know. Here below we'll be talking about standard tuning (EADGBe) - most popular songs are played in this tuning which makes it best for a beginner.
-
Begin with the sixth (lowest and thickest) string. Tune it to E (refer to the video below). Loosen or tighten the string a little at a time until the tones match.
-
Place your finger behind the fifth fret of the sixth string. This step will give you the pitch of the fifth string, which is A. Tune the fifth string to match this note.
-
Place your finger behind the fifth fret of the fifth string to get the pitch of the fourth string, which is D. Tune the fourth string to match this note.
-
Place your finger behind the fifth fret of the fourth string to get the pitch of the third string, which is G. Tune the third string to match this note.
-
Put your finger behind the fourth fret of the third string to get the pitch of the second string, which is B. Tune the second string to match this note.
-
Place your finger behind the fifth fret of the second string to arrive at the pitch of the first string, which is E. Tune the first string to match this note.
-
Touch the strings very lightly during the entire procedure; pressing hard will give you the wrong tone.
Watch the video below to learn how to tune your guitar
Understanding tablature
In this section we'll explain you what tablature is and how to learn songs from it
What is tab (or tablature)?
Tab (or tablature) is a method of writing down music played on guitar, bass, drums etc. Instead of using symbols like in standard musical notation, it uses ordinary characters and numbers. Tablature is possibly the best way to learn music for those who don't know special music notation.
How to read tabs?
In order to understand tab, you need to visualize a guitar neck as if you're playing guitar and looking down on the neck. Tabs usually consist of 6 horizontal lines that represent the strings of the guitar. The top line is the thinnest string (first) and the lowest line represents the thickest (sixth) string. The first thing you have to know is the name of the six strings. The thickest string is called the 6th string or E string because it plays an E note at an open fret (when you don't hold down any frets and just pick the string), assuming standard tuning. The next string is called 5th string or A string for similar reasons. The other string in order are 4th or D string, 3rd or G string, 2nd or B string and 1st or e string (thinnest string). As the 1st and 6th string are both E notes, we'll distinguish the 1st string by writing it in a smaller case "e".
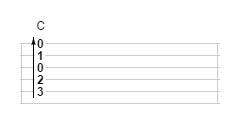
The next thing you notice on a tab is the numbers. The numbers represent frets. 1 means 1st fret, 2 means second fret and so on. A 0 (zero) means an open string. You will only ever play the strings with numbers on; if a string has no number, don't play it. For example:
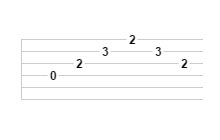
Tabs are read from left to right. The tab above means, that first you should play D string on an open fret, then G string on the 2nd Fret, then B string on the 3rd fret and so on. If you know your chords, then you would notice that this tab plays the notes of D major chord.
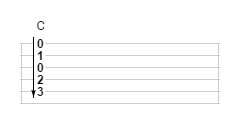
Another example: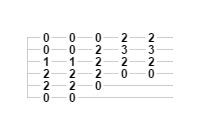
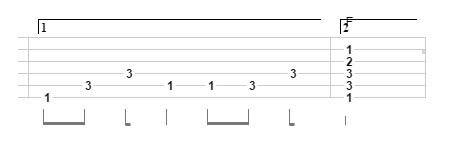
The difference between this tab and the first tab is that here multiple strings are hit at the same time, thus indicating strumming. At first you hold down an A and D string on the 2nd fret and G string on the 1st fret and play all 6 strings. If you know chords, then you would notice that this is an E major chord. According to the tab, E major chord is strummed twice. The next chord is A-major which is strummed once and then D-major is strummed twice.
The video below will explain you more about guitar tablature
Basic tablature symbols
The numbers in tabs don't really describe the subtle techniques that a guitarist can execute, so below are the tablature symbols that represent those various techniques.
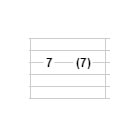
Hammer-on
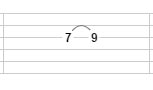
A hammer-on is played by sharply bringing a fretting-hand finger down on the fingerboard behind a fret, causing a note to sound.
Pull-off
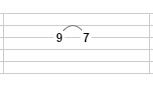
A pull-off is performed by plucking a string via "pulling" the string off the fingerboard with one of the fingers being used to fret the note.
Bend
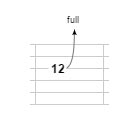
A bend is done when you push up or pull down a string in order to get a different pitch, and it's often used in solos.
Release
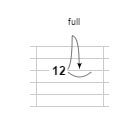
A release is done when a string is already bent and you're letting go of it.
Vibrato
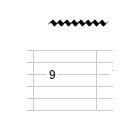
Vibrato is like a constant rhythmic bending of the string. You do a bend up and bend down quickly to create a moving sound.
Slide
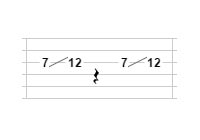
To perform a slide, start off by plucking a first note and then slide up or down to the second note on the same string.
Palm mute
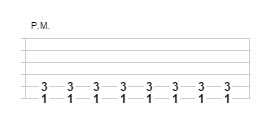
A palm mute effect is achieved when you take the side of your strumming hand and lightly place on the strings at the edge of the bridge. This will produce a muffled sound.
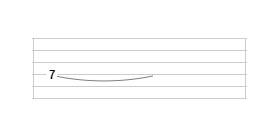
Let ring
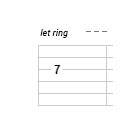
Let ring marker tells you to let that note ring until the end of the dashed line.
Ghost note
A ghost note is played softer, without emphasis, by fretting a note, rather than picking it.
Dead note
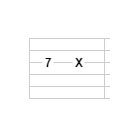
A dead note effect is achieved by lightly resting your fretting hand across the strings without actually pressing the strings against the fret.
Up/Down stroke
Upstroke is a strum running from the high E string up to the low E string. Downstroke is done from low to high.
Understading rhythm
Unlike regular text tabs, Tab Pro allows you to view and hear the tab as it's being played, with rhythm notation exactly telling you when to play a certain note/chord and how long to hold it. The basics of rhythm notation are explained below.Beat
Music is based on time. Most songs have a steady, recurring pulse called the beat. It’s the steady rhythm to which you want to tap your foot or dance. The element of time in a piece of music revolves around the beat.Bars
Beats are grouped into bars, or measures. Bars are delineated by bar lines. In many songs four beats make up one bar. The steady pulse would be counted 1, 2, 3, 4, 1, 2, 3, 4, 1, 2, and so on. Beat one always marks the beginning of a bar.Time signature
Each track in the tab contains information on it's time signature, located usually at the beginning. The top number in the fraction stands for the number of beats in a bar (in most cases it is 4). The bottom number stands for the note value that is equal to the beat of the music. In most cases the bottom number is also 4, which indicates that the 1/4 note is the pulse of the music. In other words, 4/4 time means each bar is equal to 4 1/4 notes. 4/4 is the most common time signature. Other popular time signatures include 3/4 (aka "waltz time") and 6/8 (used in "Nothing Else Matters", "We Are The Champions", "House of the Rising Sun" etc).
Notes' duration

Rhythm notation is created by altering the appearance of notes to indicate the relative duration that these notes occupy within a tab. Conversely, rests describe the relative length of silence. Notes can have different durations. A note’s duration is not expressed in seconds, but as a multiple of the tempo. A quarter note is one beat. The tempo is expressed in bpm (beats per minute).
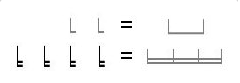
So if the tempo is 60, a quarter note lasts 1 second. If the tempo is 120, the quarter note is ½ second. The other notes are defined relative to the whole note - on the picture below there's a whole note (bar 1), then two half-notes (bar 2), four quarter-notes (bar 3), then eight 8th notes (bar 4), sixteen 16th notes (bar 5) and so on.
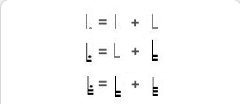
Therefore: 1 whole note = 2 half-notes = 4 quarter-notes = 8 eighth notes = 16 sixteenth notes = 32 thirty-second notes = 64 sixty-fourth notesAll rhythm values can be constructed from two rhythm values of half the duration.
Dots
Notes and rests can be attended by a small dot, appearing just to the right of the rhythmic element. This increases the duration of the note or rest by one half.
Ties
The duration of notes can also be increased by the use of ties. When tied together, the following notes are held for the duration of the second note as well. Rests are never tied together.
Beams
It is common for smaller valued notes to be grouped together via beams. Grouped notes usually have the length of one beat. Rests are never beamed.
Triplets
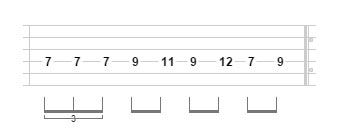
Triplets (as well as quintuplets, sextuplets etc.) consist in playing a certain number of notes in a given time-spam. For example, a triplet of eighth notes (3 x ½ beats = 1.5 beat) is played on one beat; or a quintuplet of eighth notes (5 x ½ beats = 2.5 beats) also on one beat, as illustrated by the picture below.
Repeats
When a pair of dots accompanies a double bar, it signifies that you must repeat music either from the very front of the piece or front the previous repeat symbol as follows.
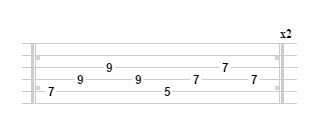
Alternate endings
A section will often have a different ending after each repeat. The example below includes a first and a second ending. Play until you hit the repeat symbol, jump back to the previous repeat symbol (not shown on the picture) and play until you reach the bracketed first ending, skip the measures under the bracket and jump immediately to the second ending, and then continue.